

Table of contents
- Use Case:
- Note:
- Here is my Solution
- Using Terraform
- Prerequisites
- Definition of terms
- Step 1: Install Terraform CLI
- Step 2: Install AWS CLI
- Step 3: Create a VPC
- Step 4: Create variables.tf
- Step 5: Create terraform.tfvars
- Step 6: Create main.tf
- Step 7: Create outputs.tf
- Step 8: Initialize the configuration file
- Step 9: Validate your code
- Step 10: See the plan
- Step 11: Apply the configuration
- Final output
Use Case:
Set up 2 EC2 instances on AWS
Deploy an Nginx web server on these instances
Set up an ALB to route request to my private EC2 instances
Make sure each server displays its hostname
Note:
The tutor should not be able to access my web servers through IP address( must only be via a load balancer
Define a logical network and launch the instances on the logic network
Instances should not be assigned private IP
You may or may not set up autoscaling
You must submit a domain name from a domain provider or the ALB'S domain name
Here is my Solution
Using Terraform
Prerequisites
Git Bash/Windows powershell
A Linux image
Terraform CLI
AWS CLI
Definition of terms
AWS(Amazon Web Services): This is a cloud provider, they provide cloud solutions for your applications. They are majorly a public cloud provider. Click here to learn more about AWS.
LOGICAL NETWORK: This is also known as VPC(A virtual private cloud) is a virtual network dedicated to your AWS account. It is logically isolated from other virtual networks in the AWS Cloud. I will be walking you through how to set up a VPC for this project.
EC2 INSTANCES: EC2 stands for Elastic Compute Cloud, It is a virtual server for running applications in AWS infrastructure.
LOAD BALANCER: A load balancer serves as the single point of contact for clients. The load balancer distributes incoming application traffic across multiple targets, such as EC2 instances, in multiple Availability Zones. This increases the availability of your application.
PRIVATE INSTANCE: An EC2 Instance launched without assigning a public IP.
BOSTIAN HOST: A bastion host is a server whose purpose is to provide access to a private network from an external network, such as the Internet. It has a public IP assigned to it.
TERRAFORM: Terraform is an open-source service that allows you to build infrastructure as code to provision resources from any infrastructure provider. Terraform creates and manages resources on cloud platforms and other services through its application programming interfaces (APIs). Providers enable Terraform to work with virtually any platform or service with an accessible API. The core Terraform workflow consists of three stages:
Write: You define resources, which may be across multiple cloud providers and services. For example, you might create a configuration to deploy an application on virtual machines in a Virtual Private Cloud (VPC) network with security groups and a load balancer.
Plan: Terraform creates an execution plan describing the infrastructure it will create, update, or destroy based on the existing infrastructure and your configuration.
Apply: On approval, Terraform performs the proposed operations in the correct order, respecting any resource dependencies. For example, if you update the properties of a VPC and change the number of virtual machines in that VPC, Terraform will recreate the VPC before scaling the virtual machines.
Variables: Input variables let you customize aspects of Terraform modules without altering the module’s source code. This functionality allows you to share modules across different Terraform configurations, making your module composable and reusable.
Resources: A resource block describes one or more infrastructure objects, such as virtual networks, compute instances, or higher-level components such as DNS records. See documentation.
Step 1: Install Terraform CLI
- Follow the steps on the link to install Terraform.
Step 2: Install AWS CLI
- Follow the steps on the link
After installing the CLI, ensure you configure your IAM secret and access keys using the command below;
$ aws configure
Step 3: Create a VPC
STEP 1: DEFINE LOGICAL NETWORK (follow the steps below)
Login into your AWS account using an IAM user. (It is best practice to set up an IAM user for your account, Follow the steps in the link to set up one
Search for VPC, click on Create VPC
Select VPC and more: this will do the setup automatically, all you need to do is edit the name of the VPC and CIDR if you want to and click create. See photo for hint.

- We are going to be using the VPC credentials for our next step.
Step 4: Create variables.tf
Kindly see content of file below. The variables.tf file is written in HCL(Hashicorp configuration language) which is the language Terraform uses. I used the variable module to create variables for my VPC id, private and public subnets etc.
variable "vpc_id" {
  type        = string
  description = "my vpc id"
}

variable "good-subnet-private1-us-east-1a" {
  type        = string
  description = "Private Subnet for us-east-1a"
}

variable "good-subnet-private2-us-east-1b" {
  type        = string
  description = "Private Subnet for us-east-1b"
}

variable "pub_sub_id" {
  type        = list(string)
  description = "Public Subnets for us-east-1"

}
variable "instance_name" {
  type        = string
  description = "My first instance name"
}

variable "instance_name2" {
  type        = string
  description = "My second instance name"
}

variable "ami" {
  type        = string
  description = "amazon linux 2 ami"
}

variable "instance_type" {
  type        = string
  description = "instance type"
}
variable "priv_sub_id" {
  type        = list(string)
  description = "Private Subnets for us-east-1"
}
Step 5: Create terraform.tfvars
This file should contain value of your variables.
Step 6: Create main.tf
Kindly see content of file below. The main.tf file was written in HCL(Hashicorp configuration language). It contains configuration to do the following:
A security group for my vpc/load bal
A target group for the application load balancer
A load balancer
A launch template with a script to install nginx and print hostname
An Autoscaling group to provision two private instances using the launch template
terraform {
  required_providers {
    aws = {
      source  = "hashicorp/aws"
      version = "~> 4.0"
    }
  }
}

# Configure the AWS Provider
provider "aws" {
  region = "us-east-1"
}


resource "aws_security_group" "my_alb_sg" {
  name        = "my_alb_sg"
  description = "Allow inbound traffic to instance"
  vpc_id      = var.vpc_id

  ingress {
    from_port   = 80
    to_port     = 80
    protocol    = "tcp"
    cidr_blocks = ["0.0.0.0/0"]
  }

  ingress {
    from_port   = 22
    to_port     = 22
    protocol    = "tcp"
    cidr_blocks = ["0.0.0.0/0"]
  }

  ingress {
    from_port   = 443
    to_port     = 443
    protocol    = "tcp"
    cidr_blocks = ["0.0.0.0/0"]
  }

  egress {
    from_port   = 0
    to_port     = 0
    protocol    = "-1"
    cidr_blocks = ["0.0.0.0/0"]
  }

}

#Create an ALB target group

resource "aws_lb_target_group" "my-alb-tg" {
  name     = "my-alb-tg"
  port     = 80
  protocol = "HTTP"
  vpc_id   = var.vpc_id
}

#Create Load Balancer

resource "aws_lb" "my-alb" {
  name               = "my-alb"
  internal           = false
  load_balancer_type = "application"
  security_groups    = [aws_security_group.my_alb_sg.id]
  subnets            = var.pub_sub_id
}

resource "aws_lb_listener" "lb_lst" {
  load_balancer_arn = aws_lb.my-alb.arn
  port              = "80"
  protocol          = "HTTP"

  default_action {
    type             = "forward"
    target_group_arn = aws_lb_target_group.my-alb-tg.arn
  }
}

data "template_file" "myuserdata" {
  template = <<-EOF
    #!/bin/bash
    sudo amazon-linux-extras install nginx1
    sudo service nginx start
    echo "<h1>I am pleased to welcome you to my page, I am $(hostname -f) by name</h1>" > /usr/share/nginx/html/index.html
    EOF
}

resource "aws_launch_template" "gladys_asg" {
  name_prefix   = "gladys_asg"
  image_id      = var.ami
  instance_type = var.instance_type
  user_data     = "${base64encode(data.template_file.myuserdata.rendered)}"
  tags = {
    Name = var.instance_name2
  }
}

resource "aws_autoscaling_group" "gladys_asg" {
  vpc_zone_identifier = var.priv_sub_id
  desired_capacity    = 2
  max_size            = 2
  min_size            = 1
  target_group_arns   = ["${aws_lb_target_group.my-alb-tg.arn}"]

  launch_template {
    id      = aws_launch_template.gladys_asg.id
    version = "$Latest"
  }
}
Step 7: Create outputs.tf
Kindly see file below. This code in this file will display my load balancer's arn and vpc_id in the terraform.state file and output the value as outputs at the end of terraform apply. See below

The other files seen .statetf, .hcl.lock are automatically created after the following commands are run:

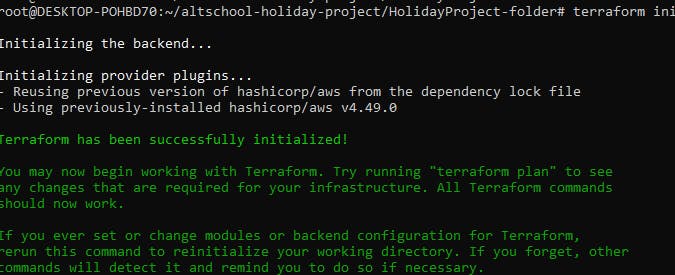
Step 8: Initialize the configuration file
- Use the command below;
$ terraform init
This command prepares the current working directory for terraform to run the configuration. See result below
Step 9: Validate your code
- Use the command below;
$ terraform validate
The code is a lifesaver as it validates your configuration, pointing out any errors or unspecified attributes in your resource blocks. I got that so many times after running the code severally. Now our configuration is super valid.

Step 10: See the plan
- Use the command below;
$ terraform plan
This shows a plan for every resource that is to be executed/deployed. It allows you to review the plan before executing the configuration.

Step 11: Apply the configuration
- Use the command below;
$ terraform apply
This takes action on the terraform configuration to create the resources.
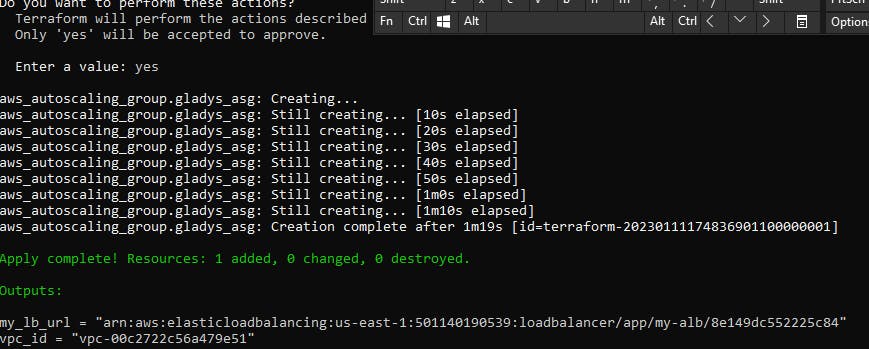
You can go over to AWS account to see your newly created resources.
Final output
I configured my domain name with route 53 and added the domain name as a rule to my load balancer. This is why you can see my domain name on the screenshot.


Thanks for reading.